In any 3D virtual environment, selecting objects with a mouse becomes difficult if the scene becomes densely populated and structures are occluded. In areas such as game development, designers can work around this limitation by creating open environments with large amounts of space between objects.
However, biocommunicators like myself aren’t afforded the same luxury, since models of anatomy represent environments in which there is no true empty space. Organs, vessels, and nerves always sit flush with adjacent structures. Consequently, accessing occluded objects requires a user to either distort the POV or remove obstructions entirely. Although individual structures can be observed, important information about the spatial relationships between different structures is lost.
For students in undergraduate anatomy courses, understanding spatial relationships is essential. Traditionally, these relationships have been taught using dissections, but rising costs and the decreased availability of specimens have led many educational institutions towards using interactive, virtual anatomic models. Of course, even when dissections are available, the spatial information of deep structures (such as the vessels of the circulatory system) is often impossible to preserve.
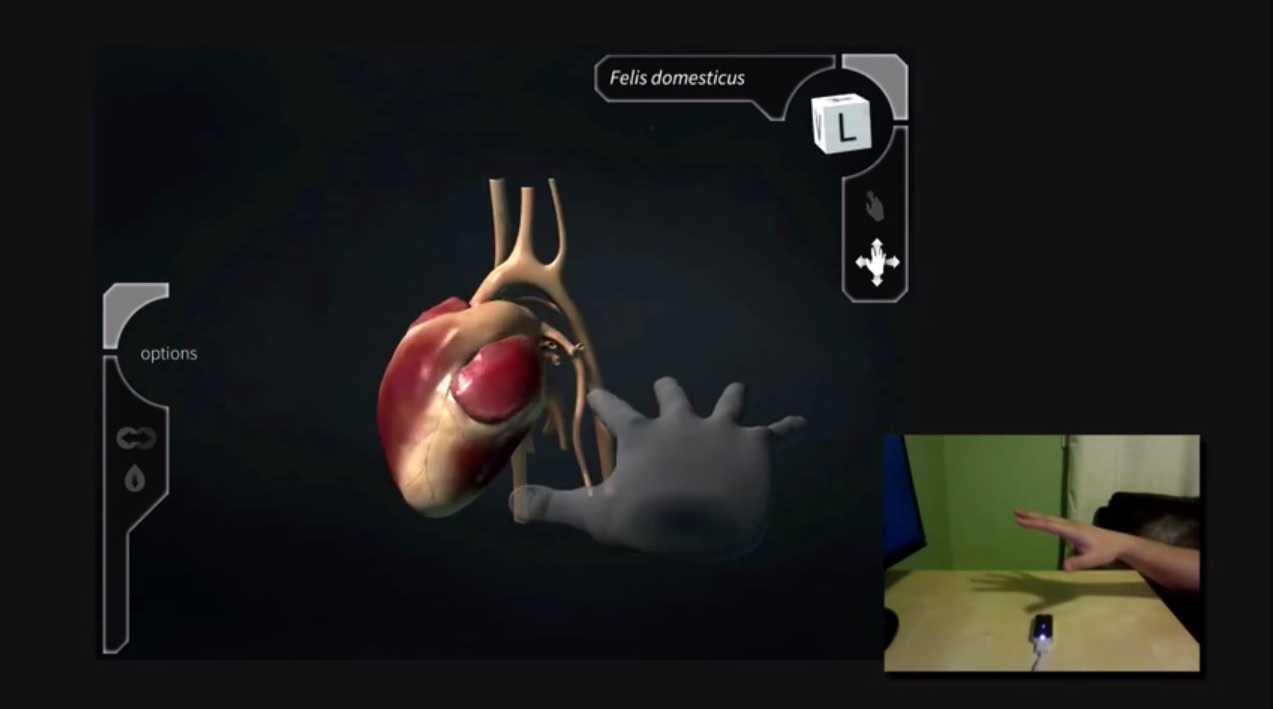
As part of my Master’s research project, I developed a tool in Unity to help undergraduate anatomy students understand the spatial relationships of the circulatory system. By integrating the Leap Motion Controller with accurate 3D anatomic models, it gives students the freedom to explore individual structures while maintaining the fidelity of spatial information.
How to Look Deeper through Design
One of my biggest challenges was building strong visual cues to convey the depth of 3D structures, especially the 3D cursor. In very early builds, the cursor simply consisted of a colourful sphere that followed the tip of a user’s finger. But after a few usability tests, I found students often felt disoriented and lost. Although they could easily move the cursor around in space, they had a lot of difficulty judging its proximity to other structures. Some of my colleagues suggested using stereopsis and 3D displays like the Oculus Rift to solve the problem, but I feared this would drastically increase the price of the tool, making it inaccessible to most students and educators.
Instead, I decided to tackle the problem as if I were working on a 2D information visualization project. How is depth conveyed if you’re illustrating a scene on a flat sheet of paper?
Occlusion
Perceptually, the strongest visual cue of depth is occlusion. Although this played a huge role creating meaningful shaders for my models in Unity, it wouldn’t help me solve the cursor problem. Viewing a partially occluded cursor would only tell a user that he or she had completely missed the model.
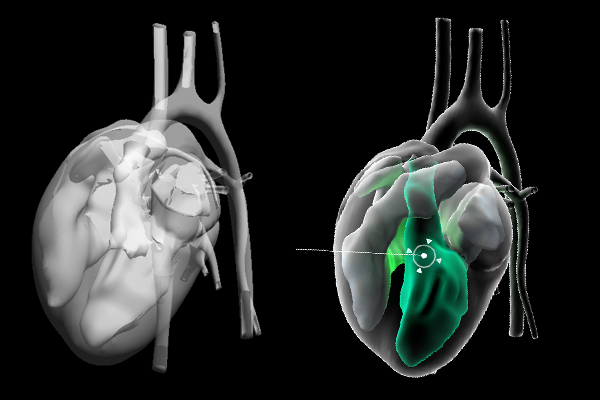
As you can see from the image above, Unity’s built-in Transparency shader (left) doesn’t do a great job at respecting occlusion, making depth perception nearly impossible. The shader I made (right) relies on rim lighting to preserve contours and occlusion, but is not especially helpful for small objects like the cursor.
Perspective
The next depth cue I looked at was perspective. Essentially, parallel lines appear to converge as they move into the distance. If you’ve ever taken an introductory drawing class, chances are you examined one-point perspective by drawing something like a long road disappearing into the horizon.
In Unity, you can exaggerate the perspective of a camera by adjusting the Field of View and Angle values. As an object’s depth changes, it will appear to grow or shrink by different degrees depending on this value. For myself, I had to use this approach sparingly or risk distorting the appearance of my anatomical models.
Light and shadow
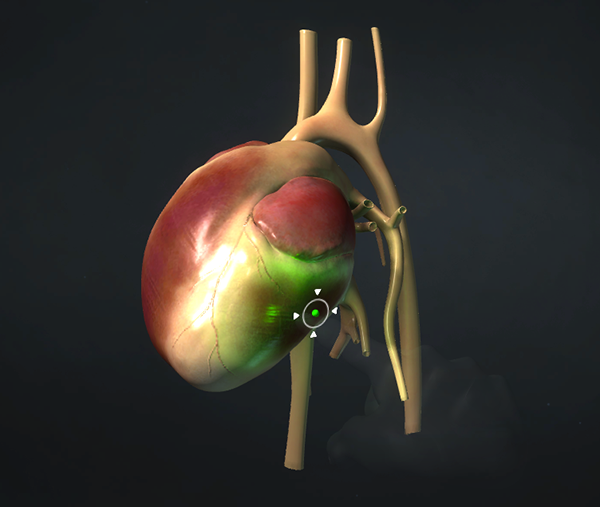
The way light interacts with the surface of an object carries powerful cues about that object’s position and shape. By making the cursor into a light source, it became incredibly easy to pinpoint its location by observing how its light reflected off the surface of other structures.
In Unity, I created a Point Light and made it a child of the cursor. I adjusted the light’s range and intensity so that reflected light was barely visible when the cursor was moved the edge of the interaction zone.
Augmented (Un)Reality/Data Visualization
Although these techniques all dramatically improved users’ ability to perceive the depth of the cursor, one major problem persisted. If the cursor moved into or behind another object, all visual feedback was lost.
I decided to augment the cursor with a HUD that would respond to the cursor’s proximity to other objects. From an emotional design stance, users were already expecting experiences similar to the JARVIS interface from the Iron Man movies. Why not give them that, but make the experience meaningful?
The HUD consists of 2D sprites parented to the cursor, which mimic a targeting system. A circle surrounds the cursor and serves as an indicator of the cursor’s position and direction. The entire HUD system was placed on its own layer, and I created a new perspective camera to render the HUD over everything in the existing scene. This solved part one of the problem – even if the cursor disappeared behind other objects, the circle would always be visible.
The “ticks” surrounding the circle served as a visualization of the distance between the cursor and any object directly in front of it. As the cursor gets closer to an object, the ticks move closer to the center of the circle. If nothing is in front of the cursor, the ticks disappear. This gives the user a sense of the boundaries of objects. They can tell if they’ve moved past an object or whether a selectable object existed inside of other objects. For instance, if the cursor is moved beneath the surface of the heart, the ticks persist, letting users know they can move the cursor into deeper structures like the heart valves.
Making Your Own Depth Sensing HUD
I’ve created a script that you can use to build your own depth-sensing HUD, which includes the Unity rigged hand available as part of the V2 skeletal beta. It’s well-commented, but I’ll give an in-depth walkthrough below:
First, you’ll have to create a Finger object and set up some kind of geometry to inherit the Finger’s TipPosition and Direction. Attach the script to this object. This will act as your 3D cursor.
You will also have to make the HUD graphical assets and import them into Unity as sprites. In my case, I made a simple triangle in Adobe Illustrator.
Once your assets are made, you’ll have to update a few public variables in the Inspector. Indicate how many “ticks” you want to appear around the cursor and attach the sprite you made previously.
public int _tickNumber; //number of 'ticks' surrounding the cursor
public GameObject _tickTemplate; //tick Sprite
You can then set a minimum and maximum distance for the HUD to be responsive (i.e. how far in front of the cursor we look for collisions).
public float _disatnceMin; //minimum distance from objects
public float _distanceMax; //maximum distance from objects
The first part of the script clones the tick sprites and distributes them evenly around the circumference of the cursor in the X-Y plane. I used four ticks, but you can try experimenting with the _tickNumber variable to make fun patterns.
//distribute the tick objects around the cursor
    void expandTicks(){

        //for each tick object...
        for (int j = 0; j < _tickNumber; j++){

            //...calcucate evenly distributed points around cursor
            float i = (j * 1.0f) / _tickNumber;
            float _angle = i * Mathf.PI * 2f;
            float _degrees = _angle * Mathf.Rad2Deg;

            float _x = Mathf.Sin(_degrees * Mathf.Deg2Rad);
            float _y = Mathf.Cos(_degrees * Mathf.Deg2Rad);

            Vector3 _pos = new Vector3(_x, _y, 0) + transform.position;

            //clone tick object and position it
            GameObject _tick = Instantiate(_tickTemplate, _pos, Quaternion.identity) as GameObject;
            _tick.transform.parent = transform;

            //hide tick object
            _tick.renderer.enabled = false;

            //rotate tick object to point toward cursor
            _tick.transform.Rotate(-Vector3.forward, _degrees);

            //add tick object and position to lists
            _ticks.Add(_tick);
            _tickPos.Add(_tick.transform.localPosition);
        }
    }
The Update method calls the following function, which casts a Ray forward from the cursor and measures the distance between the cursor and any collisions:
void castRayForward(){
        /*
        * cast a ray directly forward from the cursor
        * if the ray collides with an object resize the distance between the ticks and the cursor
        */
        float _distance;
        Debug.DrawRay(transform.position, transform.forward * 2f, Color.blue);
        RaycastHit hit;
        if(Physics.Raycast(transform.position, transform.forward, out hit, 100.0f)){
            _distance = hit.distance;
            for(int i = 0; i < _tickNumber; i++){
                _ticks[i].renderer.enabled = true;
            }
            resizeCursor(_distance);
        }
        // if nothing is in front of the cursor, hide the ticks
        else{
            for(int i = 0; i < _tickNumber; i++){
                _ticks[i].renderer.enabled = false;
            }
        }

    }
This distance is then used to change the position of the ticks surrounding the cursor:
//adjust the distance between the ticks and the cursor
    void resizeCursor(float _dis){

        //clamp the distance to fall within defined distance range
        float _newDistance = Mathf.Clamp(_dis, _disatnceMin, _distanceMax);

        //calculate the ratio of the distance to the distance range
        float _range = _distanceMax - _disatnceMin;
        float _percentDis = Mathf.Clamp(_newDistance/_range, 0f, 1.0f);

        //adjust the x and y positions of each tick based on the ratio calculated above
        for(int i = 0; i < _tickNumber; i++){
            Vector3 _moveTo    = new Vector3(_tickPos[i].x * _percentDis, _tickPos[i].y *_percentDis, _tickPos[i].z);
            _ticks[i].transform.localPosition = _moveTo;
        }
    }
And that’s it! Instant depth-sensing HUD for your Leap Motion + Unity projects.
I’ve touched on just a fraction of the interaction design that went into this project, but I hope developers find this useful. The Leap Motion Controller can provide incredible, immersive 3D experiences for users, but those experiences are inevitably filtered through the lens of a two-dimensional screen. It’s up to us to give our users the meaningful visual feedback they need in order for them to get the most out of the experiences we create. I’ve only just started to examine these design challenges, and I hope I can encourage many others to join me.
I’d love to hear any questions or feedback you may have for me. Feel free to contact me about other aspects of my project as well, such as modelling accurate anatomical structures or building a 2D menu system.

Brendan is a biomedical communications student at the University of Toronto. Check out his portfolio at brendanpolley.com.


Too simplified for medical professionals. Conduction system, and coronary vasculature would be nice…
October 27, 2014 at 9:51 am